Tuesday, December 15, 2015

OBJECT to MARK part two

Well...  
I made it home. 
Instead of sitting right down and working on the Mac armed with my ideas, tips, techniques, advice... 
I stitched.  Basket weave. Silk threads. A simple project that is colorful and one that I am stitching "in hand." Not on stretcher bars.

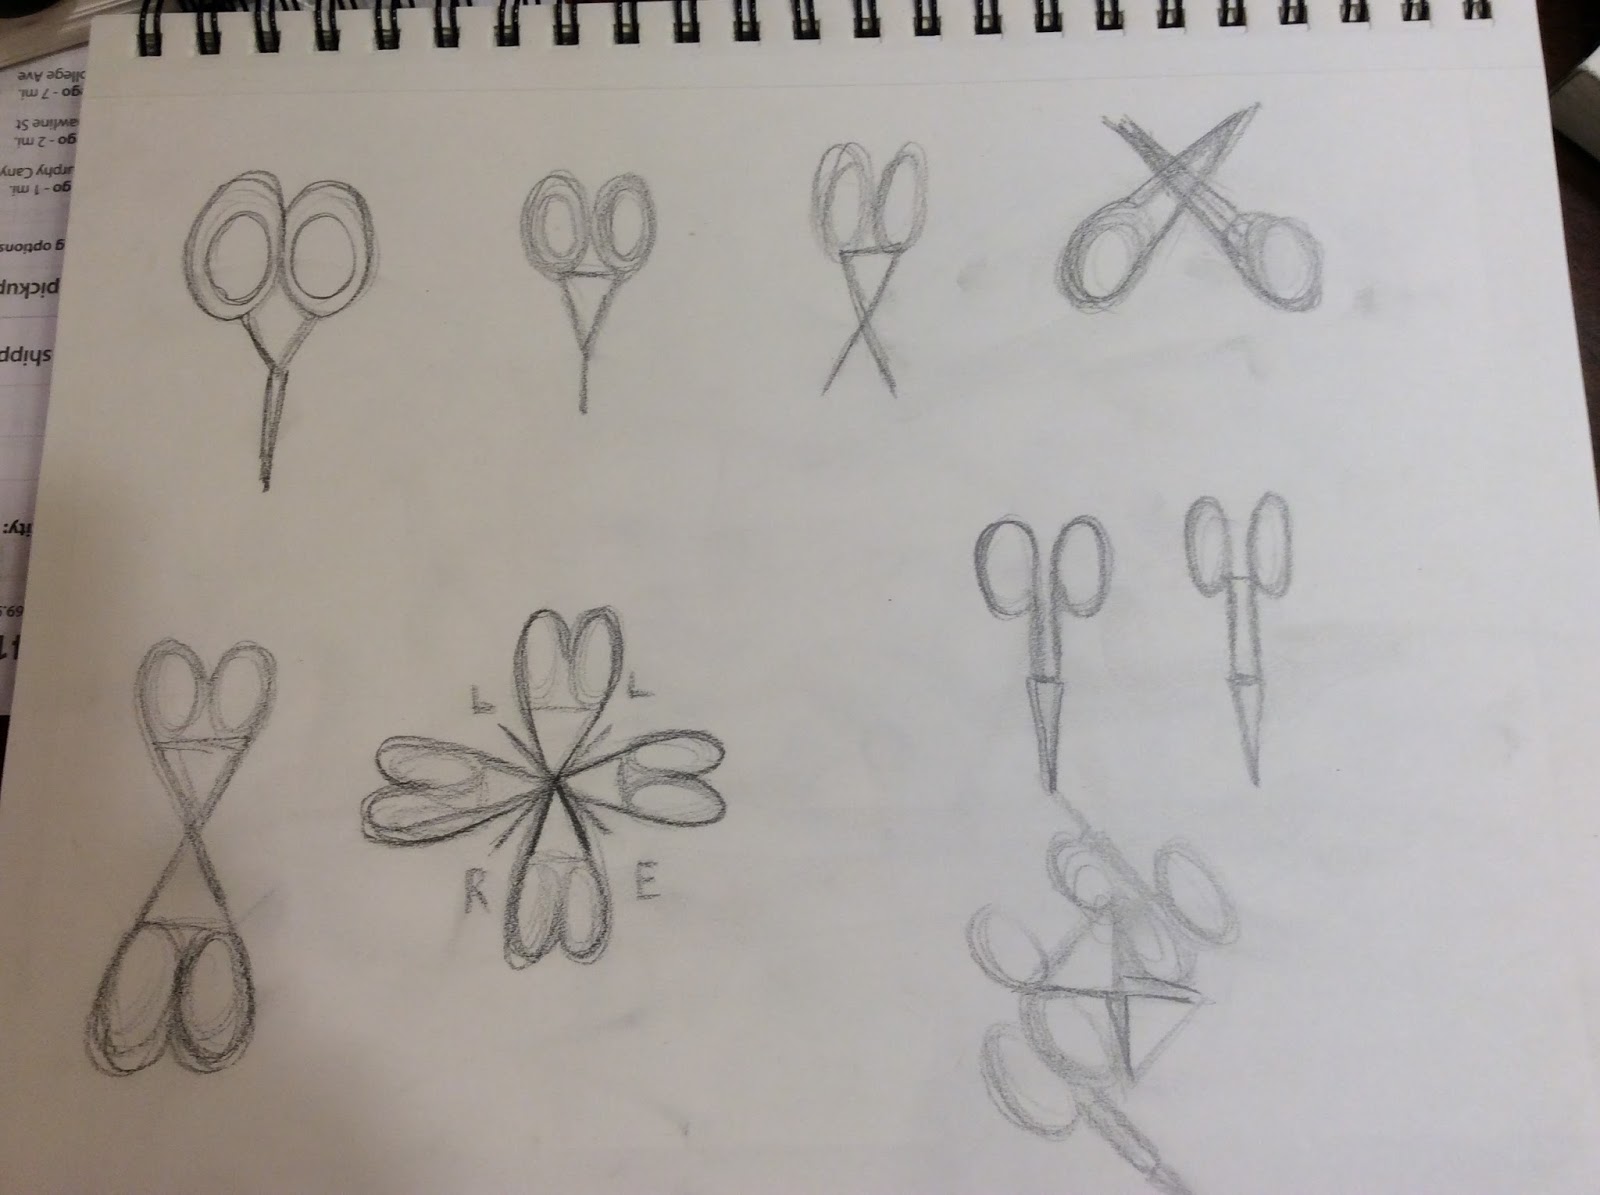
Tuesday. I started again. I reviewed my game plan and dove right into Illustrator. I made 4 art boards! and downloaded and exported 3 images. 1. The red scissors  2. The final sketched heart and scissors and  3. The opened black scissors.  
SUCCESS!!!!!!!!!!!!!!!!!!!

I rocked! I used the hollow white arrow to manipulate ellipses and circles into swirly, twirly spirals. I erased with the eraser tool. I practiced with the points and thickness, the strokes, even the fonts!!
Then.. I used the PENCIL tool!! At first my designs were uneven and .. let's say.. NOT recognizeable.. but after manipulating and mouse-ing I made swirls and spirals, twirls, and zigzaggy lines!!

My confidence grew and I realized.. That when I know the software and how to use the tools of Design.. 
I  ROCK!!


Three pages of different designs of SCISSORS and hearts!! 
First two boards:  
LEFT:  My first design. I love it. It is Abstract and I am even thinking that I might like to print it out and stitch it into a Needlepoint project. It could be put onto a box that can hold gadgets and stitching tools.  Or even stitched into a small fob to put on my favorite scissors!!!
RIGHT: The scissors became butterflys! and my FAVORITE design is the ones with the L and the needle.. I actually "made" a needle!! I love the brushy look of it and the simple image.. I can see this as a logo or on my calling card with my info. The font is Herrington. I fiddled with opacity and put an E on top of the L. I was thinking that it would be Cool! to write out ROCCOFORTE with a smaller point size and 75% opacity  and then write out LISA EDDO in a larger point size and black on top of my last name..
Oh the ideas!!!!

Third board and an Idea Board


LEFT board is my GOLD. the positive/negative logo is looking at me and whispering ideas. I LOVE the light swirly center and the delicateness of the finger holes. 
The RIGHT board is just ideas and extras.. images that I like and with work can be made into fun designs.  I even signed it as 
L heart E!  it looks like LOVE and it is my design and my signature that I used when I cross stitched. 

This is it my peeps.  
My Last assignment in ArtG100 Basic Graphic Design. 
Just like my Great Minds project in Design History.. I ended STRONG!  
I started at neutral in the beginning, excited, then I quickly moved into overwhelm mode. I wanted to quit. YES, QUIT! but I loved it so, I listened to a friend when he said, Everybody has a difficult time in the beginning learning something new. I am  techy, I have even built my own computer, and I would be overwhelmed in learning new software. You can do it Lisa, I know you can. 
I persevered,  and I learned.   
Next semester..  DIGITAL MEDIA  Learning Photoshop, Illustrator, and InDesign.  I talked to the teacher and told her that I would enroll and IF it was closed before I could register, would she ADD me. I enrolled a few weeks ago and Friday she asked if I was enrolled in the class for it was closed. I said YES, and she said that she is looking forward to working with me in class!! 
She remembered me :)

I posted it to my Homework Blog,  sdccdesign100LisaEddo@blogspot.com 

So, OFFICIALLY, I am out of class and on my way.. 
I LOVE BEING 
A Student of Design     lisa


Monday, December 14, 2015

OBJECT to MARK assignment Part One.

Object to Mark assignment.  Part one...

This assignment is the most useful moving forward in the Graphic Design process.. 
It is the building block of how a Designer.. designs. 
First, the inspiration:


My embroidery scissors. The bottom red pair is from France, Bodin. I purchased them in Victoria, Canada, BC. They are 2.5" and have a matte, satiny finish.. my favorite. Sharp and a great hand feel, plus they are petite and fun to use!
The black ones.. I bought in Julian, California on a whim.  2.75" long, matte black, sharp! and I liked the retro packaging.
I stitch, for those who don't know me. I am an Artist with Thread. 
I LOVE the hand feel of thread and yarn, the colors, 
the geometrics, the thought process, the women I meet in this genre, Everything.. HEART!!!!
Cross stitch, Needlepoint, Crochet, some knitting, needle and thread. My Nona [ Italian for Grandmother ] taught me to embroider when I was young.  She was a seamstress in Montebeluna, Italy where she was born and lived until she moved to America with her husband and her brother in her early 20's. She sewed couture at many design houses and designed and sewed her own trousseau and wardrobe.  She taught me to sew a French seam and everything else with a needle and thread. I don't even remember learning nor when I didn't know how. We started embroidering and crocheting edges on pillowcases.. The others came after when I realized that I hate embroidery.. another story! 
When I was young, I would sit by her elbow and sew, stitch, and sometimes draw and design clothes and accessories for me and my dolls.  Often, we would pray the Rosary in Italian and play "Remember When." I love that game. " I remember when.." or "Remember when?" 
SKETCHING THE DESIGN came next. 


Oh My!  He told us that we can also use tracing paper over the photo to sketch out the positive and negative spaces. I skipped that step, but now I think that I may try it for the next project.

I can SKETCH! I can GESTURE!!  no fear, no intrepidation,  no panic, and no first thought of "I can't draw very good and it won't be very good and it certainly won't LOOK like I want it to look."
Thanks to Drawing 1 WITH the very talented, Professor Wayne Hulgin at San Diego City College [ greatest serendipitous story.. EVER..] I sketched.. What I wanted and How I wanted it to be!!! With confidence in my talent and ability.. 
.. pause for a moment for the realization..."
Final sketch. There were several others that I liked in my sketches, but this one.. I liked best of all.
THEN onto Illustrator..  
FRUSTRATION level RED  
and this is what came out of it.. 

NOT HAPPY..  AT ALL!
I do like the "bandage heart" made up of rounded rectangles, circles, and a triangle. I am thinking that with a little tweaking and manipulating.. It would make a good Needlepoint design.  An ornament, a coaster, even a round purse. Basketweave or a selection of stitches in each section with a dark brown 898 DMC outline or just collaged next to each other.  

Monday's class was a Wall Critique.  We printed out our project, and put it up for the class to critique. It wasn't as bad as I thought it would be, lots of tips, ideas, techniques, advice, and one Pearl of Wisdom, Sean said to me.. "Don't do it all. Edit. You are trying to get EVERYTHING in there, great idea, just scale back."

Last day of class. Project needs to be refined and FINAL image posted to Blog before midnight Wednesday.  For people who need help.. Wednesday is the last day of class. 

Bittersweet ending. As I drove home I realized that my first semester as a Graphic Design Major is almost behind me.  
After this assignment.. I really am on my way.. 
almost full stream ahead as 
A Student of Design.... Lisa


Monday, December 7, 2015

Great Minds Project Milton Glaser

Great Minds Project..   Graphic Designer and Fine Artist   Milton Glaser

I posted this to my Design 100 Blog.. but to be honest peeps..  Just to excited to contain it ONLY to that blog..
I am so excited about this spread.  i have come a long way Baby since the first day and I am just over the Moon about it.

First two pages.  Cover and first page.


I am excited about the layout.  It actually came to me as I was driving and I jotted and sketched my idea in between lights.. and there were quite a few!!!  Since my Artists and Designers class and my Drawing 1 class where we HAD to keep a Sketchbook for a grade, I have kept one in my purse and a cute pen.  I am actually filling it up with ideas, sketches, storylines, etc.   
I like the STRATHMORE  SKETCH  book 5.5 X8.5   70 pages  Green Cover. 
 Second page  and third page    Iconic work and WHY I chose Milton Glaser for my Great Minds project
Fourth page and fifth page   Fine Art work and Quotes 
I can relate to MANY of these quotes, but my favorite by far, especially now is.. 
DRAWING IS HOW I THINK.. 

Sixth and final page  Bibliography
Here it is.. The man that spoke to me, through a film, in a stadium room, all by myself and started me along this wonderful, exasperating, fulfilling, and wild ride.  

He ROCKED my world and now, finally, I am.. 
a Student of Design..  Lisa


Wednesday, December 2, 2015

My Favorite project in PHOTOSHOP

Photoshop.. yes, I have a favorite project in Photoshop.
I really liked this project.
We downloaded black shapes that we cut out of construction paper and exported
the images to PhotoShop. After watching a very informative beginning video made by Rafael Lopez, we started manipulating shapes, colors, layers, opacity, transparency, and using the magic wand.
Do I enjoy PhotoShop? NO
Will I use it again?  Yes, it has many useful tools, you could say I like the PARTS, not the WHOLE.

Today.. I am .. A STUDENT OF DESIGN..   Lisa

Tuesday, December 1, 2015

I ENJOYED ORANGE.. T H I S M U C H!!!

I enjoyed ORANGE so much..

That it appeared in TWO of my assignments..  Grids & Modularity + Patterning

GRIDS   Complimentary Orange and Blue

AND... Patterns / Patterning 

The two Oranges are actually my mix of COLORS!!  

Color.. will always be a good thing for this..   A STUDENT OF DESIGN.. Lisa


SUNSET ORANGE part B

For Part B.. We were to take the color and give it an Emotional Name.. think OPI nail polish colors..

I chose my color and named it Sunset Orange.  My emotional pull towards this color has come from my car.  It is a 2005 Chevrolet Corvette. I bought it used in January 2013 in Atlanta, Georgia at a Car Lot called Corvettes.Com.  I bought him, shipped him home and he arrived on Valentine's Day.
I named him the Southern Gentleman. His official color is...
Daytona Sunset Orange Metallic.


I have always been partial to RED  You could say it has been my signature color after Blue, of course.  Now, I am still a RED girl, my hair is red too! But, now I am partial to the complimentary of Blue, and that is ORANGE.


I had a GRAND time researching the Emotion and the random trivial facts about this color. I don't think that I will ever look at a Clown's hair again with out knowing that it has it's beginnings from Bacchus!! Ritual madness and ecstasy!! ALSO.. the Golden Gate Bridge is ORANGE, painted that color because it is a highly visible color in the FOG!!
I even HAD to include a quote from my favorite Artist.. VanGogh.
There is no Orange without Blue..  

And this post is why I LOVE BEING.. A STUDENT OF DESIGN
Lisa

ORANGE. SUNSET ORANGE actually..

Yes.. Sunset Orange..

Week 7 taught us Color and its Meanings and Messages.
First, we attempted, in Adobe Illustrator.. Color Swatches.

For Part A.. we downloaded images in a wide variety of colors.. 

RED  PINK  YELLOW  BLUE  GREEN  PURPLE  NEUTRAL  BEIGE,  GREEN, or TAUPE
BLACK  and WHITE

and then we used the eyedropper tool to drop and place colors into the swatches. You can see my second progress a few posts back.. i enjoyed this process so much that I spent days and days with images and eydropping color upon color..  I will share my frivolity in the next few posts..

But first.. the assignment.. We were to select ONE color. Name it and post it with its CYMK and RGB color values.

I named them all.. Yes, I did :)  
From Left to Right:
Light Orange  Sunset Orange   Pumpkin Orange  Red Orange  Darkest Reddest Orange

I CHOSE.. Sunset Orange
CYMK    Cyan  10  Magenta  78  Yellow 100 and K [Blue] 22
RGB        Red 218   Green 91  Black 22

I knew I wanted to complete an Orange Part B so I searched and practiced on several Orange images
From Top to Bottom:  
Pumpkin Stem Green    Pumpkin Shadow    Medium Pumpkin    Light Pumpkin  Pumpkin Highlight  

This image is VanGogh's Study of an Orange..  I LOVE this Palette.  
I call it Van Gogh's Compliment   Colors Top to Bottom:
VanGogh Orange Highlight    VanGogh Orange Shadow  VanGogh Orange 
VanGogh Complimentary Blue  and VanGogh Blue Eyes

There are many other colors in this painting and in my Works in Progress, I have 20+ swatches that I am finding. In that file are two other Van Gogh paintings.. Starry Night and Haystacks.. 


Color is an integral part of my life, I think that is what I have always gravitated towards.. at one low point in my life, I even started a blog .. Beyond Beige.  
My hobbies have always been color based and color just sparkles for me.. I would not be surprised at all if these color palettes show up in my needlework, crochet, knitting, or just in my life.. 

for now I am ..   A [Colorful] Student of Design.. Lisa


COLOR Week 7

On Week 6 and 7 we explored COLOR.. yes.. my favorite week and Subject..

We painted a grayscale..
I have painted in grayscale many times and have sketched it also.. Technically, a Gray Scale helps the artist determined the values of gray between Black and White.  Think.. Black and White photography and movies.  I have discovered through my attempts, that to really make your artwork POP! it needs the blackest black and the whitest white to work.. to be complete. 
Here is my attempt at the GrayScale Ladder

I am not 100% happy with it.. there is too much of a jump between WHITE and #2 .. For my level of expertise.. it is a good attempt. 


Monday, November 30, 2015

Change of Plans

I changed my Blog.. Actually, I just added a new one. The original plan for this blog was for a grade.
For the Graphic Design Basic 100 class. Submit your work, get a grade.  So, I did. Everything was going well, oh so I thought, until the Instructor showed a few past student's blogs.. Oh oh.
My blog is informative, funny, and a Web Log of my experiences as A Student of Design.. Oh, and my homework.
No.. It is intended to be a Portfolio of work.
Missed that memo I did!  Oh well.. No harm, no foul.

Started a new blog..

http://sdccdesign100lisaeddo.blogspot.com

Now. I have two blogs.  This one will show my journey into the wide beautiful world of Graphic design.  It will be informative , funny, and encouraging.. Because everybody is A Student of Design both formally or informally. It will show my homework, my classes, my trials and tribulations while I learn and master the InDesign, Illustrator, and yes, Photoshop software, and my own personal journey into a new layer of my life..

The new blog will be strictly Portfolio quality homework.

A little dry, straight forward, and to the point perhaps.. A post will be just showing the work.. No explanation, no back story, no angst and agida, sweat of my brow... Well you understand..
Just images of my completed work and a few sketches..

THIS blog.. Oh ho!! This blog will have ALL that, and more.. The chains are off, the door is open, the sun is shining... Yada. Yada, and blah blah...    Let's go!!

I like to say " lock and load Ladies" and " let the games begin,".   But you will get the pictures..


I hope you will stop by soon to check out my homework/portfolio blog..

Until we meet again.. here, or there,  I still am.. and will always be..

A Student of Design....   Lisa


Tuesday, October 20, 2015

COLOR COLOR COLOR

COLOR  is a Wonderful thing!!! 

We worked in COLOR COLOR COLOR COLOR COLOR COLOR COLOR  and more color.
We painted a GRAY SCALE
We painted composition with Hue  Shade Tint and Tone

and we went digital.   CMYK  RGB

and learned how to use the EYE DROPPER TOOL..

Who knew a tiny little insignificant little tool could open the gates of H E A V E N!!

Yes!  I found my calling.. I could spend hours tweaking and dropping and coloring one image.
This is what we did!!!!!

RED      Red chilis    Color that speaks to me:  the first one..  I named it.. Firey Firecracker Red
 PINK   Japanese cherry blossoms  


ORANGE    Sunset Reflection      Color:  the third from the Left:   Sunset Serenity

YELLOW    Baby Mallard ducklings   The two names I kept thinking about while creating this palette is such: Left:  Yellow Duckling  and the far Right : Pond    
BLUE    Fabric    I LOVE the color blue.. so they are all my favorite colors! However..
                                   I named them all..  from L to R:
 Loyalty Blue     Perky Periwinkle    The Best Blue EVER   Cozumel Bay Blue    January Sky Blue
GREEN    The Bird's Eye view of a City Park       This one was time consuming, yet successful.
                          I want to call the green on the left:  City Green  
PURPLE    Lavender Fields in Provence    
                            The second color from the Left is called:  Lavender Blue Dilly Dilly  and the color on the Right is called Lavender Fields Green  [ Dilly dilly..  you are my King.. dilly dilly and I am your Queen.. ]  ok.. a few moments of song.. I love that song and it has been a long day :P
NEUTRAL: TAUPE / BEIGE     A very restful bed..
                       The 3rd color / the middle color.. all I could think of as I was searching and dropping was.. flesh..   and I came up with.. ahem..  My Lover's Skin  A little pale, but sexy just the same ;)
WHITE     A white Peacock       This one was difficult. My original page had this image in it and I loved working on it.  This is my favorite spread.. I will need more time gazing at it and time away from it to come up with a names for this color palette..
BLACK     A pair of Elephants.      I love this image.  The greyscale was difficult to master, and the white did not convey.. but something about this image touched my soul, my heart. my creativity.  Something about the way it is cropped and the embrace..  *sigh*
I need space to think about naming this palette.  All I can think of are obvious names like -             Tusk for the white box and Buddha Black ..
This is it..  yes.. I know that this is posted before the painted images.. BUT...
I have been in a little bit of a funk.. and the computers are picking up on my energy and my files are being .. deleted.. not saved.. evaporating.. blowing in the wind..
Pick your metaphor.. all I know is that it is frustrating .. 
and I am really proud of my work.. so I am going to post it 
RIGHT AWAY!!!
The other Color Study I did in class just didn't make it onto the Memory Stick or whatever and it almost made me cry.. 
ok, yes.. I did cry. I worked for the entire class time and was so proud of it.. and it is GONE! 
Enough of the complaining it is said that this phenomenon is just power for the course, and to be expected.. 

ENJOY this post... I absolutely LOVED it!!!!!
Oh.. my favorite box... heart heart heart heart   BLUE!!  
and of course my favorite color..  Best Blue EVER 
and my favorite image.. nope.. can't do it.. I love them all..  

Today, and maybe forever.. 
I am and will be          A STUDENT OF DESIGN     

Thursday, October 8, 2015

TEXTURE using Text

TEXTURE..

Texture:  The surface character of a physical material or the illusion of a physical material
                Texture creates visual interest in your design

This project we uploaded a cute little story called Far far away and CUT, COPY, and PASTE in place in a pre-made template in Adobe Illustrator.

The rules were:  Using the Far far Away text Word .doc create 3 pages of 5 Justified blocks of text using 3 texts. Use type, font, point, leading, and kerning to create a simulated texture.

Vocabulary List: 

Type/ Typography: The art of arranging type, which includes letters, numbers and symbols, so that             it is pleasing to the eye. This includes not only the font that is used but how it is arranged on               the page: letter by letter, size, line spacing, etc.. Typography is an important part of creating a             pleasing final graphic design product.

Font:  Name of a typeface, Example:  Helvetica, Georgia, Arial, Trebuchet, Times, & Courier

Point: A measure of size used principally in typesetting. One point is equal to 1/12 of a pica, or
           approximately 1/72 of an inch. It is most often used to indicate the size of type or amount of
           leading added between lines. Smallest  Small  Normal  Large  Largest 

Leading: The vertical spacing (measured in points) between lines of text.
(It is pronounced like   led.. Smiling, she led them down the rosy path of Graphic Design or..
The pencil lead on her drawing pencil was worn down to a nub. )


Kerning:  Adjusting the lateral (horizontal) space between letters. Kerning is the adjustment of space between pairs of letters. Some pairs of letters create awkward spaces. Kerning adds or subtracts space between letters to create more visually appealing and readable text.

So.. armed with this knowledge.. off I went.. I made text boxes, copy and pasted the text, and manipulated, and moved, and created.. Texture using Text..


There are only two examples right here.. BECAUSE.. the third page DID NOT save!!

This is what I was explaining a few posts back.. files get lost, misdirected, not saved, or poof.. go into cyber space or into the wind..


So.. enjoy these posts and I will be back when order is restored in my Little world..
so until I am not..

**UPDATE**  I found this little rascal.. so here it is ..  I am not sure why it has a block of text to the Left.. I have checked, rechecked, and checked and it is still there.. Will regroup and try, try, try again..

I will continue to try to be A Student of Design,   Lisa

TEXTURE using text

This lesson we learned about TEXTURE.
Seeing texture; Creating texture; adding texture to a design; Using photos in PhotoShop to manipulate and simulate texture.
Sean uploaded a very cool video using Photoshop to create simulated texture from stock images or images that we upload.. Although he did not require a template to be created and posted.. I think that I will try to upload and create my own.. stay tuned..

This lesson.. We were to take photos of TEXTURE, upload the images to an InDesign template and describe the texture by text.
I LOVE taking pictures of texture!! So, I looked at my photos on my camera and phone and uploaded several to use!! Peeling paint on walls; flowers in the market; Cubby, my cat's grey fur; My own red hair braided; tomatoes in the market; a close up photo of a box of silver forks in a box at an Antique Market; and the repetition of the ribs in a corrugated steel wall;

If.. you are so inclined.. check out my Instagram account, French_knot_twist, for a texture layout I created.
Yes, I love Texture..  I think I might even surprise you someday and upload a few photos.. soon..

But, in the meantime....

Here is my Texture Observation project

I enjoyed this project immensely.  First, I love texture and take many photos of texture. It was enjoyable going through my photos.. memories <3  and Second, I am working with placing images in boxes for my Design in History. ArtG 118. Design spread. Resizing; moving them around; zooming in and out; Fitting Content to Frame and Fitting Frame to Content; ahhh.. the list is endless..
However, I am getting pretty good at it!! so this template and project was easier and fun.. I even helped a fellow student place her photos.. Sometimes, teaching someone else how to do something is the way to master it yourself..

I am enjoying being  A Student of Design,  Lisa

VISUAL PRINCIPLES Emotions: Group

Visual Principles in Design  Group Project.

Sean uploaded a file of emotions for us to use the core elements, Point  Line  Plane  to visualize an EMOTION.  As a group of 9 and using the core elements and the design principles, we had to choose 3 emotions to visualize.

Our final project:

Our emotions were PITY; OPTIMISTIC; POSSESSIVE

I think we did well and it was helpful to watch other students who are more skilled in the Software to bleed off the shapes using the masking tool; to change the color to white; and to manipulate the shapes in a radius.. Interesting..

I usually do not like Group projects because there is always one who sits back and lets the other members do all the work and yet take the credit.. This time, this class, this project, everyone worked well together and I believe our designs show our cohesive group..

Lessons learned for this    Student of Design,   Lisa

VISUAL PRINCIPLES Planes

Visual Design Principles  Final Post    PLANES

PLANES:  A PLANE is a surface or a flat area extending in height and width;
                           A line with breadth.
                           A field of text is a PLANE built from points and lines of Type.


This is my last entry for VISUAL PRINCIPLES.  Like I said before, I enjoyed this lesson.
Adobe Illustrator is an interesting Program and i will look forward to using it many times in the lessons ahead.
It feels pretty good to post this Homework and to move on..

A Student of Design,   Lisa 

VISUAL PRINCIPLES Lines

VISUAL DESIGN PRINCIPLES... Continued...

Lines:  A Line is an infinite series of Points which has length and direction, but no breadth.  Lines turn and multiply to describe PLANES; A Line is any mark connecting any two separate points. It can organize, direct, separate, or suggest emotion in a design.


I explained how I created this lesson on the previous post.. so I will add a little more information how I created these pages.. I used the LINE TOOL.  After selecting the setting, one will then "click" on the point where you want to start the line.. and drag the "line" where you would like, but.. the BEST little tip I received was at the same time you are clicking and dragging.. hold the SHIFT key/button and OMG!!!   success WILL be YOURS!!
Am I excited about this? YES, yes, and uh huh!!

By holding down the SHIFT key, it creates a truer line, circle, square, shape and makes the task so much easier.  After you create your shape and you click somewhere else, a dialog box comes up and if you click OK, it will create more of the same shape. Sean, my Design 100 teacher, commented to make several similar shapes in the margin to use again. I made a variety of lines in different thickness, lengths, and size and that helped the Design Process to flow..

This lesson was by far my favorite, yet it was the most difficult, challenging, and while working on this lesson, the one that was deleted several times!!  Yes, deleted. I swear I saved the pages.. to the DESKTOP, not to the Memory Stick, like Eugene, the Lab Tech, is always reminding us. However, the next day.. it was GONE, evaporated, dissolved into the computer, or floated away in the air.. GONE.. So, I spent an entire Saturday in the Computer Lab working on this lesson, and success was mine. Success in learning to manipulate the lines and success in learning to back up my Memory Stick.. I now have 3. Yes, a bit excessive, but I am not about to lose my work again..

This lesson was my favorite, because by now, I am learning tips and tricks to actually get what is in my mind down onto the template.  I have the ideas.. I just need to learn how to execute them..
My favorite squares are TENSION.. it takes a delicate touch and good "mouse control" to tweak a line! My other favorite CHAOS.. I found the large stroke by accident and I think it adds to the chaotic way this lesson has made me feel during the process.

Next Post.. PLANES..

Still, a Student of Design,   Lisa


VISUAL PRINCIPLES Points


Finally.. Finally.. 
ALL my Design Basics ArtG 100  Homework is completed and I will begin to post it TODAY!!!
I am not sure exactly how to post.. so.. I will post each Assignment separately. 

And so, it begins.. 

Graphic design is the art of visual communication through the use of images, words, and ideas to give information to the viewers. There are basic assumptions to guide the design practice and these are called 

VISUAL PRINCIPLES: 

Points, Lines, and Plane are the building blocks of design 
and are the three core elements

A POINT marks a position in space;
A series of POINTS forms a LINE; 
A mass of LINES become a shape, or PLANE;

DESIGN CONCEPTS: 

Symmetry: Passive, formal space; a mirror image; creates balance; 
                  creates organization,  order.

Asymmetry: Without symmetry; active, dynamic space; creates attention and 
                     visual interest.

Emphasis: The special attention or importance given to one part of a composition; 
                  emphasis can be achieved through placement, contrast, size, etc..

Rhythm: Is a repeated pattern, such as what we hear in music. In different art forms, 
               it can be a very complex interrelationship or a regular, steady beat.
               Regular:  intervals between the elements, and often the elements themselves, 
                              are similar in size or length
               Flowing:  a sense of movement; 
               Progressive:  a sequence of forms through a progression of steps

Positive/ Negative space: The space surrounding a positive shape or form sometimes is                   referred to as ground, empty space, or void
The perfect example of this concept, I think, is the arrow in the FED EX logo.. Once you see the arrow.. you always will see it!!  Look for "hidden images" 


Unity:  Refers to the cohesive quality that makes a composition feel complete and finished;
            Unity gives it the feeling that all the elements relate to each other in a compatible 
            way to form a unified whole.

Scale:  Size of something, related to a constant size, unit of measure, relative whole 
            ( such as the human body, or picture plane )

Repetition:  A repeated sequence, occurring more than a few times; In design, repetition 
             can create visual consistency and a sense of unity; 
             Repetition and change awaken Life's visual juxtapositions.

Chaos:  Complete confusion, disarray, although, creation emerges from chaos; 

Order:   The arrangement of the elements in relationship to each other according to a
              particular sequence, pattern, or method.

Tension:  The arrangement of elements that are not in relation to each other by stress;
                proximity; and lack of order

Space:  The distance or area between or around things; 


In this lesson.. we used the 3 core elements, Point, Line, and Plane to communicate the design concepts.   

To keep you, my reader, coming back to follow my journey into Design.. 
I will post this Lesson in three separate posts.  

So.. to START..  POINT 
  
POINT:  A POINT marks a position in space. The point serves as the focus; an element that has position (x,y), but no extension or mass. A series of points forms a line, a mass of points becomes a shape. 


I used the pre-made template with layers created in Adobe Illustrator.  
It was difficult, I will not lie.  This was my first attempt at creating "shapes" with a program. I used the Rectangle tool to create many different shapes.. 
This lesson, since Points are usually circles..  I used the Ellipse setting to create Circles 

In the following lessons I used the Rectangle setting to make Squares and the Polygon setting to create a Triangle with 3 sides;   

Many, many attempts were met with SUCCESS!! yet many more were met with DEFEAT :(

Each success and failure taught me many lessons.. and in the end..
I rather enjoyed this Lesson.. In many ways.. 

Next post... LINES.. 

Until then.. I am..    
A Student of Design... Lisa